Showing posts with label recipe. Show all posts

Wednesday, April 24, 2013

Day 21: Paleo Potluck & Zucchini Lasagna

I was invited to a Paleo Potluck and honestly had no idea what to make!  I first thought of the sloppy joes, but knowing how messy that could be I decided to scratch that idea.  I checked the invite to see what other folks were bringing and figured I could make my zucchini lasagna.  I also had some Brussels sprouts and decided to bring a side dish as well (yes, I was really busy in the kitchen that day).  

We had a lot of fun and the food was awesome!  There were salmon, curry meatballs, chicken stir-fry, chicken wings, almond butter, cucumber water, and apple crisps!  The food was so delish that we might have another potluck this weekend.  Anyway, on to a recipe: 

Zucchini Lasagna (adapted from The Food Lovers Kitchen):

Ingredients:
  • 1 lb of ground meat (beef or turkey - I've tried both and loved it equally)
  • 1 cup of green bell peppers, diced
  • 1 cup of onion, diced
  • 1 tbsp of basil 
  • 1 tbsp of parsley
  • 1 tbsp of oregano
  • 1 Zucchini, julienne (thinly sliced)
  • 1.5 cups of mushroom, sliced
  • 15 oz of tomato sauce
  • 6 oz of tomato paste 
  • 3 cloves of garlic, minced
  • Salt & Pepper, to taste
  • Red crushed pepper flakes (optional - if you want it spicy)
Directions:
  1. Preheat oven to 325 degrees.
  2. Brown the meat over medium heat - breaking it into pieces.
  3. Add garlic, onion, and green peppers and continue to cook for about 5 minutes.
  4. Stir in tomato paste and tomato sauce.
  5. Then add parsley, basil, and oregano.  Bring sauce to a boil, then remove from heat.
  6. Taste the sauce and add salt and pepper if needed. 
  7. Grab a 9" x 13" baking dish and layer the sauce thinly in the baking dish.
  8. Then layer the zucchini and mushrooms over the sauce - repeat and alternate the layering of sauce, zucchini and mushrooms. 
  9. Bake the lasagna for 15 minutes - covered.  Then, remove the foil and increase the temperature to 350 and bake for another 15 minutes.  
  10. Remove and enjoy!

Friday, April 5, 2013

Day 4: Coconut Butter and the Last Cake Tasting with my Sister...

Did I mention how grateful I am for plantain chips?? Seriously, it's my lifesaver through this Whole30 challenge (so far...).  However, I need to be careful because I can seriously finish a bag of them in NO TIME!  However, I have to admit that the plantain chips are very filling and I haven't craved nor felt hungry all afternoon (I had them for lunch along with my Five Guys bun-less burger again... I know, I won't have another one this week or next).

What worried me tonight was my sister's last cake tasting for her wedding.  I scheduled most of my sister's wedding cake tasting and had scheduled her last one for April 4th because the reviews for this place were so hot that I had to fit it in!  This was before I knew the Whole30 challenge was going to be in April (or I would have found a way to squeeze it in March).  I was actually scared I would cheat tonight because the last few times I went cake tasting with her... I ended up finishing most of the cakes (well, me and her fiancee).  I have a serious sweet tooth, really.

The cake place served up some serious cakes.  They provided samples of: red velvet, traditional, almond mousse, white cake with strawberry filling, white cake with raspberry filling, lemon mousse, Italian cream, strawberry, and a few others that I've forgotten.  I was actually sad because the place smelled wonderful when we entered and I really wish it was still March!  However, I was super good and only drank water.

Later, my sister did tell me that it was a good thing I didn't cheat for those cakes because she didn't think it was worth it.  The cakes we had in March were better - whew! If anything, I'm glad this was the last cake tasting for us because she made her decision! So I survived her last cake tasting and I had a few spoonful of coconut butter once I got home.  That made it all better for me.

Speaking of coconut butter, you're probably wonder what it is.  It's just coconut flakes that has gone through the food processor and it turns into this creamy, sweet "butter".  It's all natural and very good as a snack!  I'll just give you a quick recipe on that to prove how easy it is to make coconut butter.

Ingredients:
  • Unsweetened Coconut Flakes or Shreds (1 bag)
Directions:
  1. Empty the bag of coconut flakes into your food processor.
  2. Turn your food processor on and let it go for about 8 minutes.
  3. Check to see if you need to stop the food processor and scrap down the coconut.
  4. Around 8 minutes you will see the flakes turn into this creamy substance.
  5. Empty the butter out into a mason jar (or jar of your choice).
  6. ENJOY! 


Thursday, April 4, 2013

Day 3: Baked Mahi-Mahi with Couscous

I am just happy to say that I did not have leftovers for lunch today! I feel like that's all I've been eating lately (not complaining... really).  So my girlfriend and I went over to Five Guys for lunch... yes, we went to a burger joint!  But no worries... Five Guys is compliant with Whole30 because they do not season their beef.  They use 80/20 ground beef and just grill it without any oil.  They have grill their mushrooms and onions (most of their toppings) oil-free as well.  After we found out about that, we decided to eat out and "spoil" ourselves.  I also dropped by Whole Foods and picked up a bag of plantain chips to go with our bun-less burgers.  The staff looked at me funny, but I didn't care! It was seriously the best combo ever!  Okay fine... I would have liked the cajun fries with my burger, but the plantain chips as substitute worked :) 
For dinner, I decided to be "creative" and make Mahi-Mahi (my favorite fish) with a side a "couscous".  Yes, I know... it's really cauliflower rice, but  my sister had tried it before and thought it was couscous.  Probably because I processed it too finely and it does not look like rice.  Regardless, I seasoned and baked the fish (recipe below) and it was pretty darn good!

Ingredients:
  • A filet of your favorite fish
  • 1 tbsp of Adam's Reserves House Rub Spice
  • 3 or 4 slices of lemon (round)
  • 1 tsp of paprika 
  • salt and pepper to taste
  • 1/2 tbsp of extra virgin olive oil


Directions:
  1. Preheat your oven to 400 degree F.
  2. Season fish on both sides with spices, paprika, salt and pepper. 
  3. Then drizzle the olive oil over the fish.
  4. Place the lemon slices on top and baked uncover for 10-12 minutes.  The fish is ready when you place a fork down the middle and it cuts easily.  Enjoy!

Monday, April 1, 2013

Whole30 - Day 1: Of Course I Made It! (plus Turkey Sloppy Joe Recipe)

Day one is always the "yay, I feel great! Mission accomplished for now!" but we'll see how it goes when the weekend approaches.  I did prep myself by reading the Whole30 forums all weekend and I think I have it down (somewhat). 

For breakfast, I had 2 soft-boiled eggs with half an avocado and some tomato slices.  It was actually pretty filling because I wasn't hungry at my usual time (between 10:30AM-11AM).  I also had coffee with whipped coconut milk (from the can!).  I was actually amazed by how it good that milk was.  I've found a recipe for creamer that is Whole30 compliant, but I am not brave enough to try it (yet).  It's basically a can of coconut milk, an egg, and a tsp. of coconut oil all mixed together.  I'll be honest, it's the raw egg that bothers me.  I am very... oh, let's say "O.C.D." about salmonella.  I dislike prepping chicken and when I do, I clean and sanitize every. surface. area. of. my. kitchen.  That being said... raw eggs... yes, not sure when I'll try it, but will update when I do!

For lunch, I had turkey sloppy joe except without the bread.  The sloppy joe was made right from my kitchen and the recipe is super yummy!  In fact, I used to make this before I went on paleo and loved it with the 100 calories sandwich thins (with an actual burger bun is super delish too). Oh, and with mustard!

However, you may also eat it on it's own or with lettuce (kinda like a lettuce wrap but with juices coming out).  I actually enjoyed this meal so much that I had it again for dinner!  Now, you're wondering how this is compliant... well, no worries... I'm sharing this recipe with you :)


Turkey Sloppy Joe
Ingredients:
  • 1 lb of ground turkey or beef 
  • 2 tsp of coconut oil (or olive oil)
  • 1/2 onion, diced
  • 1 green bell pepper, diced
  • 3 tbsp of tomato paste 
  • 1 cup carrots, grated
  • 1 can (15 oz) of tomato sauce
  • 4 pitted dates, diced
  • 5 tsp of ground yellow mustard
  • 4 tsp of balsamic vinegar
  • 1/2 c and 2 tbsp of water
  • 1 tsp crushed red pepper (or 1 jalapeno, diced) but this is optional if you like spicy food
  • Lettuce or burger buns (depending on what you like) 
Directions:
  1. Heat a large skillet over medium-high heat and add oil.
  2. Add onions and bell peppers - cook until onions are translucent (about 4-5 minutes).
  3. Stir in tomato paste, carrots, and 2 tbsp of water - cook until carrots are tender (about 2 minutes). Remember to stir occasionally!
  4. Add ground meat and cook until it is no longer pink.  Stir and break up the meat as it cooks.
  5. Stir in tomato sauce, dates, vinegar, mustard, and 1/2 cup of water.  Bring to a boil.
  6. Reduce heat to low, add the red crushed peppers or jalapeno, cover and simmer for about 15 minutes. 
  7. Serve with bread (if you have no restrictions) or with lettuce!

Sunday, January 15, 2012

Stuffed Shells (with love!!)

My boyfriend loves eating in, which is fine with me because I love being in the kitchen.  Last weekend he was craving for some "Stuffed Shells" and I've never made them before (nor had them either) so it was challenge I accepted! ;) 

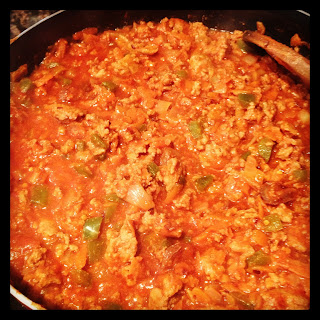
After searching for a "good" recipe, I finally found one that I liked from http://blogchef.net.  I took his Stuffed Shell recipe and modified it (like always).  

Ingredients:
  • 1.5 lbs of ground beef (we usually use lean)
  • 1/2 onion, diced
  • 3 cloves of garlic, minced 
  • 1 bag of Italian blend cheese
  • 2 cups of skim ricotta cheese
  • 1 cup of bread crumbs
  • 1 jar (26 oz) of spaghetti sauce of your choice
  • 8 oz of tomato sauce
  • salt and pepper to taste 
  • jumbo pasta shells (one box)
  • 1/4 cup of red wine (this is optional)
Directions:

Brown the meat with onion and garlic.  Preheat the oven to 400 degrees F and just to save time... go ahead and cook the pasta according to the directions on the box/bag. 


After the meat and browned, drain the excess juices and let it cool for a good 5 minutes.  


In a mixing bowl, combine the meat, ricotta cheese, half the bag of Italian cheese,  bread crumbs, and salt and pepper for taste. 


 Carefully spoon the mixture into the shells.  Prior to putting the shells (or even putting the meat mixture in the shells), combine the spaghetti sauce with the tomato sauce.  Spread some of the sauce (do not use it all!) on the bottom of the baking dish.  Then carefully place and arrange the stuffed shells on the baking dish. 

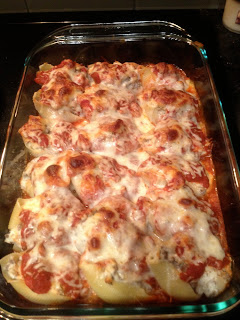
After your shells are neatly placed, mixed the red wine with the remainder of the tomato and spaghetti sauce and cover the stuffed shells with the sauce.  Sprinkle the rest of the Italian blend cheese on top of the sauce.  Bake for 20-25 minutes.  


 Your stuffed shells should come out looking something like this! Bon appetit!


Saturday, January 7, 2012

Sandy's Pot Roast - New Year... New Food... Better Blog

Hello... it's been a while since I last blogged.  I've actually been yelping a lot trying to keep my elite status for 2012 (which I finally received! yay me!).  But! one of my new year resolutions is to post more whether it's about places I've tried or about my baking/cooking adventures.  

So, to start my 2012 blog, I've decided to talk about my "Sunday Pot Roast."  This cozy recipe not only warms your body, but it's very comforting.  However, do know that this takes a few hours to cook.  

Ingredients: 

  • 3-4 lbs of chuck roast (if you want more flavor, get 2 lbs of chuck roast and 2 lbs of bone-in beef short ribs)
  • 1 tablespoon of vegetable oil
  • 1 onion, chopped
  • 2 celery, chopped
  • 1 cup of baby carrot (or 2 carrots, peeled and chopped)
  • 1 lbs of white mushroom (thick sliced or quarter- however you like 'em)
  • 2 tablespoon of tomato paste
  • 14.5 oz of chopped tomato (canned)
  • 1/2 cup of tomato sauce 
  • 2 teaspoon of sugar
  • 1/2 cup of water
  • 1/2 cup of red wine 
  • 1 whole garlic, peeled and separated 
  • 1 tablespoon of dried thyme 
  • salt and pepper to taste

Directions: 

First off, make sure you get a nice piece of chuck roast (like the one shown below).  That baby was at least 3 lbs and I trimmed off some of the excess fat to make it a bit healthier.  


Then, pat the meat with a paper towel and season with salt and pepper.  I usually use fresh cracked peppers and sea salt to season my meat with.  Turn on your oven to 300 degree F.  In a dutch oven, add a teaspoon of vegetable oil and brown your meat (at medium-high heat).  I cut mine up to make cooking easier, but you can brown the entire meat intact if you'd like. 


After your meat is browned, take it out and place it on a plate or bowl (make sure it catches all the juice that's still coming from the meat) and set it aside.  

Reduce heat to medium and cook celery, onions, mushroom, baby carrots, potato, and tomato paste until the vegetables begin to soften.  


Then, add diced tomatoes, tomato sauce, sugar, water, 1/2 cup of red wine, peeled garlic, and thyme.   


Place the meat and its juice back with the vegetable mixture.  Turn the heat back to medium-high and bring the pot to simmer.   Cover the dutch oven with its lid and place the dutch oven inside the oven (at the center) and cook for about 3 hours.  The pot roast will be done when the meat falls apart once you stick your fork in it.  If the meat does not fall apart easily, then cook it for another 30 minutes.  


We usually eat this with rice.  If you want more flavor, I recommend adding beef short ribs (with bone) and browning it with the chuck roast.  The bone will fall out once the pot roast is done and it's very good too!  

Bon appetite! 

Sunday, October 30, 2011

Cake balls made easy!

Hello... I know I went MIA for a while, but now I'm back (and with a super easy recipe too!).

I've noticed a huge craze for cake balls and I've seen tons of recipes for them as well.  In fact, my friend bought me one from Starbucks because she was surprised I haven't tried one out yet. Let me tell you... they are yummy, but not so easy to make (at least the coating of the cake ball isn't).  However, after much "research" I found an easy way to make cake balls! WOOHOO!

First, pick up your favorite cake mix box (i.e. Duncan Hines or Betty Crockers).  I picked the cheapest box there was, which ended up being Duncan Hines.  My favorite flavor: red velvet :)  So yes, I went for my favorite cake mix and I also picked up a whipped cream cheese frosting by Duncan Hines as well.  


Now... make the cake as directed on the box.  After the cake is ready, allow the cake to cool down (takes about an hour).  Then crumble the cake with your hands! Yes... in a bowl, crumble the cake and add half the container of frosting to the bowl.  Make sure the cake and frosting is thoroughly mixed... if the cake mixture feels dry, then add more frosting.  


On a cookie sheet (with parchment paper on top), mold the cake mixture into a ball and place it on top of the cookie sheet.  I used my hands to do this, but if you want less mess then I suggest using an ice cream scooper (a small one).  Once you've finished making the balls, place them in the freezer or the refrigerator and let it "harden" (takes about another hour or so).  

Once the cakes are ready, it's time to dip them in chocolate!  Now, I'll admit, my first few cake balls ended up poorly because I was trying to use white chocolate and it just did not coat well and I kept burning the chocolate (yes, they were wasted).  However, I used dark and milk chocolate and that worked out.  Make sure you buy a few packages of either chocolate chips or chocolate bars because it takes a lot to coat the cake.  

Follow the directions on the back on how to melt the chocolate.  Then, dip the cake balls one at a time in the chocolate.  Place it back on the cookie sheet and either refrigerate them or freeze them for another hour.  Viola! You've just made cake balls!  Now, you may decorate them with sprinkles prior to placing them in the fridge.   

My cake balls apparently were super tasty and moist (I used almost the entire container of frosting).  

Sunday, June 19, 2011

The Bake Off: Cookies n Cream Brownies or Cupcakes?


My dad's side of the family loves getting together for good food.  This past get-together I decided to make something for the kids (we have a HUGE family).  Anyways, with my food-porn addiction, I came across two recipes that I've been dying to try: Cookies and Cream Brownies and Cookies and Cream Cupcakes.  Who would be the best judges on dessert!?  THE KIDS!  So... I whipped both of them up.  

Just so you know.. I took a TON of pictures while I baked my heart out (my boyfriend doesn't like sweets so I rarely get to bake).  

I know... hindsight this might not have been a fair challenge, but I have to admit it was fun and the kids really showed what they liked by leaving NOTHING behind and hiding some to take home.    

The first thing I baked was the brownies because it was the easiest thing to make.  To be honest, I was trying to make both as the same time, but I finished the brownie before the cupcake.  

I usually like to tweak recipes, but I didn't this time.  I wanted to make sure I can trust the blogger so I can have a reference for future cooking/baking ideas.


So... the Cookies n Cream Brownies: first, I crumbled a bar of Hershey's Cookies 'N Creme bar (and I pre-heated the oven to 350 degrees F).

Next, I melted 1/2 cup of butter in a sauce pan (in low heat).   After the butter was melted, I moved the sauce pan from the heat and stirred in sugar, eggs, and 1 teaspoon of vanilla.

Then, I beat in 1/3 cup of cocoa powder, 1/2 cup of flour, salt, baking powder, and the candy pieces.

After the batter was mixed, I poured it in a greased 8 x 8 square pan and baked it for 25 minutes.  If you don't want a fudge-like texture in the middle (and it is yummy and gooey), then bake it for 30
minutes.  
The recipe for the brownie:
  • 1/2 cup butter
  • 1 cup white sugar
  • 2 eggs
  • 1 teaspoon of vanilla extract
  • 1/3 cup of unsweetened cocoa powder 
  • 1/2 cup all-purpose flour
  • 1/4 teaspoon of salt
  • 1/4 teaspoon of baking powder
  • 1 bar of Hershey's Cookies 'N Creme bar (4 oz.)

By the way... I took this recipe from someone on tastespotting.  I know... I saved it on PDF format, but I did not save the person's name ::sigh::

Okay, so the Cookies and Cream cupcakes... I first twisted off 12 Oreo cookies and made sure the side with the icing is placed on the bottom of the cupcake liner.  I saved the other half of the Oreo cookies as toppings on the cupcake.  Afterwards, I mix in butter and sugar first, then added the eggs.

In a separate bowl, I combined the rest of the dry ingredients (to be listed below).  Then I add milk and mixed the better until it was smooth.


Then I spoon the batter into the cupcake liners with the Oreo on the bottom.  Bake for about 20 minutes.  Then I mixed the Cookies and Cream Frosting while I waited for the cupcakes to cool down.


Cookies and Cream Cupcake: (makes 12 cupcakes)
  • 12 Oreo cookies
  • 1/2 cup butter
  • 2/3 cup sugar
  • 3 eggs
  • 1 cup flour
  • 2/3 cup cocoa powder
  • 1/5 tsp baking power
  • 1/2 tsp salt
  • 1/4 cup milk

Almost forgot!  I preheated the over to 350 degrees and baked it in that temperature.

So onto the frosting (which was decadent!).  I grind the other half of the cookies in a food processor and set it aside afterwards.  I then mixed the butter and powdered sugar.  Added the milk and vanilla and beat until it was fluffy looking.  I then added the cookie crumbs and combined.


Ingredients for the frosting:

  • 1/2 cup butter
  • 4 cups powdered sugar
  • 1/4 cup plus 2 Tbs milk
  • 2 tsp vanilla
  • 12 oreo cookie half crumbs 

The frosting was the most amazing part of the cupcake!  After I tasted it, I thought the cupcakes would be amazing! But... at the end... the brownies were the kids favorite.  Sadly, after the 10-year old took a small bite of the cupcake, she sat it down and no one else would try it.  I didn't think it would be that bad because of the frosting, but the cake mix was absolutely TERRIBLE!  I was embarrassed that it came out so badly! (and it isn't my recipe either! I actually took this off Heather Christo's blog.)

Luckily, the brownies saved me!  It was so yummy, the kids were all fighting over it!  It was such a hit, I was asked to make the brownies for my cousin's upcoming birthday.  WOWZER!   Now, all I have to do is find a better chocolate cake recipe and the cupcakes will be the next hit with the kids.


Friday, March 25, 2011

Chicken Nicoise- FAILED!

So one night, after realizing that I should eat a lil' bit healthier... I pulled out my Betty Crocker Cookbook to see if I can find a tasty and healthy meal.  If anything, this cookbook is my favorite because it has never fail me... until now.

I wanted to make a chicken dish and saw the recipe for Chicken Nicoise.  What really caught my attention about this dish was the "low-fat" coding next to the name.  Anyways... I followed the instructions to the T and it tasted pretty bland.  Or as one might put it, "it tastes like a low-fat meal."

Anyways, if you're wondering what's in this chicken:

  • 1 3/4 cups of chicken broth
  • chicken breast
  • 3 cloves garlic- chopped
  • 1/2 cup frozen small whole onions
  • 1 tablespoon Italian seasoning
  • 2 medium bell peppers, sliced
  • 6 Kalamata olives- pitted and chopped
The ingredients sounds great, but the chicken turned out alright.  Maybe it was me, but I really think this dish needs something else to make it yummy.